Posts

Showing posts with the label ubuntu

Install Symfony on Vagrant Environment

Image
Vagrant is a tool for building and managing virtual machine environments. Assuming you have already installed and  vagrant up your virtual environment. Execute the following instructions on your terminal console. Download symfony installer sudo curl -LsS https://symfony.com/installer -o /usr/local/bin/symfony sudo chmod a+x /usr/local/bin/symfony Create project directory symfony new my_project Then, you can: * Change your current directory to /vagrant/my_project * Configure your application in app/config/parameters.yml file. * Run your application: 1. Execute the php bin/console server:run command. 2. Browse to the http://localhost:8000 URL. * Read the documentation at http://symfony.com/doc Running #1, should produce result similar to this: php bin/console server:run [OK] Server running on http://127.0.0.1:8000 // Quit the server with CONTROL-C. If you have private network map set in Vagrantfile then do not use server:run as it only listens to http...
Python: Install ansible with pip

Note that ansible can only be run on a machine with Python 2.6 or 2.7 Install ansible package using pip module: sudo pip install ansible Install required packages: sudo pip install paramiko PyYAML Jinja2 httplib2 six To install the latest development version: sudo pip install git+git://github.com/ansible/ansible.git@devel

Python: Creating Virtual Environments and Managing Packages

Creating the Virtual Environment Using virtualenv virtualenv [env_name] source [env_name]/bin/activate Using pyvenv (includes pip in the default packages) pyvenv [env_name] source [env_name]/bin/activate Managing Packages Install the latest version of package: pip install [package_name] Alternatively, you can use python -m to install a package using pip module: python -m [module_name] install [package_name] Install a specific version of a package pip install [package_name]==[version] If you would like to install the flask package with a minimum version, this is how to execute it: pip install flask>=0.10.1 Install packages just for the current user: pip install --user [package_name] Upgrade a package to the latest version: pip install --upgrade [package_name] Remove package(s) from the virtual environment: pip uninstall [package1] [package2] ... [package] Display information about a particular package: pip show [package] Display all the packages installed in...

Vagrant: Installing Vagrant

Download VirtualBox and Vagrant Create a directory for your virtual environment mkdir vagrant_env1 cd vagrant_env1 Install your preferred box (Ubuntu 12.04 LTS 64-bit for this example): vagrant init hashicorp/precise64 or vagrant init vagrant box add hashicorp/precise64 You may check this HashiCorp's Atlas box catalog for more type of boxes. By the way, a "box" is a base image of an operating system. This enables you to quickly clone a virtual machine rather than starting from scratch, which would be a slow and tedious process. Installing may take some time, but after that, you can re-use this box when you want to create another virtual environment. Now run vagrant up: vagrant up To enter the virtual machine, simply SSH: vagrant ssh

Python: Install pip on Mac OS X

Download get-pip.py Run the following command: sudo python get-pip.py Upgrading pip: pip install -U pip

Vim: Using Abbreviations

VIM abbreviations can save typing and/or improve typing accuracy. By using :ab or :abbreviate , you can define abbreviations in VIM editor or the .vimrc file. i.e. This command will automatically replace "cia" with "central intelligence agency" :ab cia central intelligence agency or :abbreviate cia central intelligence agency i.e. You can also shorten a line of code :ab ubb #! /usr/bin/bash The above code will replace ubb with #! /usr/bin/bash The following command will remove a specific abbreviation :una ubb or :unabbreviate ubb This command will remove all abbreviations defined :abc or :abclear

Bash: Caret Substitution

Sample command: echo "dev" && echo "my dev" Replace "dev" with "prod": ^dev^prod Previous command will now be this: echo "prod" && echo "my dev" To replace all occurences of "dev": ^dev^prod^:& Previous command will now be this: echo "prod" && echo "my prod"

Getting Started with Composer

Install Composer Run this command in the root directory of your project: php -r "readfile('https://getcomposer.org/installer');" > composer-setup.php php -r "if (hash('SHA384', file_get_contents('composer-setup.php')) === '41e71d86b40f28e771d4bb662b997f79625196afcca95a5abf44391188c695c6c1456e16154c75a211d238cc3bc5cb47') { echo 'Installer verified'; } else { echo 'Installer corrupt'; unlink('composer-setup.php'); } echo PHP_EOL;" php composer-setup.php php -r "unlink('composer-setup.php');" Alternatively, you may run this in your command line: curl -sS https://getcomposer.org/installer | php Create the JSON file for your packages Put a file named composer.json at the root of your project, containing your project dependencies: { "require": { "vendor/package": "1.3.2", "vendor/package2": "1.*", "vendor/...

Bash: Copy files by extension from sub-directories to another directory

Goal: Copy all image (*.png) files from all sub-directories of dir1 into single directory, dir2. Source: bash_examples/ dir1 - dir3 - f1.png - f2.png - f5.jpg - dir4 - f3.png - f4.png Destination: bash_examples/ dir2 - f1.png - f2.png - f3.png - f4.png 1. Change the directory to dir1 cd ~/Desktop/bash_examples/dir1/ 2. Find all files with .png extension then apply cp command to copy each file from dir1 to dir2 find . -name \*.png -exec cp -v '{}' "/Users/mac0611/Desktop/bash_examples/dir2" ";" ./dir3/f1.png -> /Users/mac0611/Desktop/bash_examples/dir2/f1.png ./dir3/f2.png -> /Users/mac0611/Desktop/bash_examples/dir2/f2.png ./dir4/f3.png -> /Users/mac0611/Desktop/bash_examples/dir2/f3.png ./dir4/f4.png -> /Users/mac0611/Desktop/bash_examples/dir2/f4.png cd ..; ls dir2/ f1.png f2.png f3.png f4.png

Bash: Calculate Date in Ubuntu and Mac OS

Display current date date +'%Y-%m-%d %H:%M' 2015-08-07 17:06 Add 3 mins, 5 days, 2 months, 4 years to current date (Mac OS) date -v +3M -v +5d -v +2m -v +4y +'%Y-%m-%d %H:%M' 2019-10-12 17:09 Add 3 mins, 5 days, 2 months, 4 years to current date (Ubuntu) date -d "3 minutes 5 days 2 months 4 years" +'%Y-%m-%d %H:%M' 2019-10-12 17:09

Enable OPCache on Ubuntu: Alternative to APC Cache

If you are using PHP 5.5, it is not supported by APC Cache. For reference, see PHP Bug #65731 PHP 5.5 comes with it's own opcode cache which can be enabled with the following steps: 1. Enable opcache in php.ini sudo nano /etc/php5/apache2/php.ini Look for the line: ;opcache.enable=0 And replace with: opcache.enable=1 2. Enable the php mod sudo php5enmod opcache sudo service apache2 restart If you are using PHP lower than 5.5, then you can still use APC. Just run this line in the terminal to install APC. sudo apt-get install php-apc

Install MONACO Font in Ubuntu

To download MONACO font in Ubuntu, follow the steps below: #1: Install directly: 1. Download http://www.gringod.com/wp-upload/software/Fonts/Monaco_Linux.ttf 2. In ~/Downloads, click Monaco_Linux.ttf 3. Click the Install button. #2: Using terminal: 1. If you have cURL installed, run the following in the terminal: curl -kL https://raw.github.com/cstrap/monaco-font/master/install-font-ubuntu.sh | bash #3: Manual installation: sudo mkdir -p /usr/share/fonts/truetype/ttf-monaco; cd /usr/share/fonts/truetype/ttf-monaco/ sudo wget http://www.gringod.com/wp-upload/software/Fonts/Monaco_Linux.ttf sudo mkfontdir cd /usr/share/fonts/truetype/ fc-cache

Oracle Virtual Box: Set Wider Screen Resolution

Image
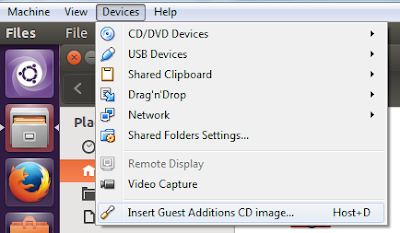
This is for a scenario where you installed Ubuntu in virtual box but the screen resolution is small. (640x480) From the Ubuntu screen, go to Devices > Install Guest Additions CD Image . This will mount the CD to your Ubuntu CDRom. Next, Click Run Software or run the file VBoxLinuxAddition.run as root user. Then reboot Ubuntu VM. Alternatively, you may install the packaged version from the terminal: sudo apt-get install virtualbox-guest-dkms virtualbox-guest-utils virtualbox-guest-x11 Then reboot. After that, you can then adjust the window size of your Ubuntu VM.

Oracle Virtual Box: Access Windows (host) Folders and Drives from Ubuntu (guest)

Image
If you have an Ubuntu OS installed with Oracle Virtual Box, and your host OS is Windows, the following procedure will allow you to share drives or directories from Windows to Ubuntu. From you Ubuntu screen menu, go to Devices > Install Guest Additions CD Image . This will mount the CD to your Ubuntu CDRom. Next, Click Run Software or run the file VBoxLinuxAddition.run as root user. You may have to restart Ubuntu after this. After restart, go to Device > Shared Folder Settings . Click the (+) icon then create a name for the folder or drive to share. Also check the "Make Permanent" option. Now we're done with the shared folder. In my example, it's D_DRIVE for D: Then in Ubuntu, open Terminal and run the command below: sudo mount -t vboxsf <shared folder> <path to local directory> Here is my example: sudo mount -t vboxsf D_DRIVE /home/hanapiers/D_DRIVE You may also add the command in  /etc/rc.local  without the sudo .  This will ...

MySQL Without The Login Prompt

There may be times when you want to use MySQL without the login prompt like when running cron jobs. For that MySQL has something called Option Files wherein you can specify commonly used options so you do not need to enter them in the command line. To use MySQL without the login prompt, create a file in your home directory: touch ~/.my.cnf Modify the file and paste the following configuration: [mysql] user=your_mysql_user password=your_mysql_password You may also specify your configuration for mysqldump so that you can backup files with cron periodically :) [mysqldump] user=my_user password=my_password

Install Sublime Text 2 in Ubuntu

1. Download Sublime Text 2 2. Unzip the downloaded file tar vxjf Sublime\ Text\ 2.0.2.tar.bz2 3. Move the Sublime Text 2 folder in /opt directory sudo mv Sublime\ Text\ 2 /opt/ 4. Create a symbolic link for sublime so that you can execute it anywhere using the terminal sudo ln -s /opt/Sublime\ Text\ 2/sublime_text /usr/bin/sublime Note that /usr/bin must be included in the $PATH variable for the symlink to work. 5. This time, create a desktop file so that sublime can also be executed through a launcher in the Unity . sudo sublime /usr/share/applications/sublime.desktop 6. Copy the following in sublime.desktop [Desktop Entry] Version=1.0 Name=Sublime Text 2 GenericName=Text Editor Exec=sublime Terminal=false Icon=/opt/Sublime Text 2/Icon/48x48/sublime_text.png Type=Application Categories=TextEditor;IDE;Development X-Ayatana-Desktop-Shortcuts=NewWindow [NewWindow Shortcut Group] Name=New Window Exec=sublime -n TargetEnvironment=Unity 7. To set Sublime as the def...

Installing Git in Ubuntu

To install git, run: sudo apt-get install git After installing git, you may setup the following configuration: git config --global user.name "Your Github Name" git config --global user.email "email@example.com" git config --global color.ui true

Create Bash Aliases With Arguments In Ubuntu

Image
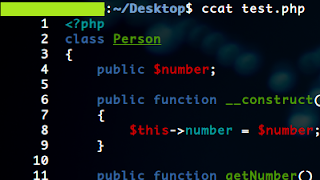
The scenario here may not be the same with you but the point is you want your bash alias to work with parameters. Say I want to display a file's content in colors and I want the output to display line numbers as well. For the color part, I used python's syntax highlighter called pygments and I used bash built-in line numbering command called nl . Now to achieve my goal, I have to pipe nl to the result of pygmentize: pygmentize test.php | nl This is quite a hassle especially if you have to do it frequently only with different files. Unfortunately, bash alias does not directly accept parameters. The solution is to create a bash function. ccat() { pygmentize $1 | nl } or multi-line: function ccat() { pygmentize $1 | nl } I named the function ccat (custom cat) because it works like a cat command but the syntax is highlighted. Put this function in ~/.bashrc and then restart your terminal or use source: ccat test.php

Ubuntu 14.04 Changing Apache2 Document Root to Home Directory

The default DocumentRoot setting for Apache is in /var/www/html/ . During development, this is sometimes troublesome cause we might ran into permission issues. To prevent that we can change our document root to a location where we have more control ie. your home directory. Here is what you need to do to change your document root. 1. Look for the ff. lines in /etc/apache2/apache2.conf . <Directory /var/www/html> Options Indexes FollowSymLinks AllowOverride None Require all granted </Directory> 2. Change /var/www/html to your home directory /home/<user>/public_html 3. Look for the ff. line in /etc/apache2/sites-available/000-default.conf DocumentRoot /var/www/html 4. Change /var/www/html to your home directory /home/<user>/public_html 5. After saving the changes, create a public_html folder in your home directory, restart apache. sudo service apache2 reload 6. To test if it the document root is now pointed at your home directory, ...

Display File Content with Colors and Line Number - Alternative to cat (Ubuntu)

Image
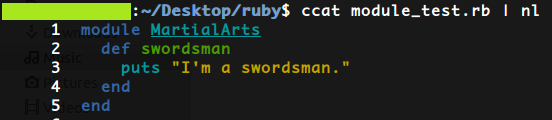
Sometimes you may want to quickly display the contents of a file directly on the command line with the `cat` command. And sometimes the contents of that file is the source code of a program. If you want to display the source code markup with colors and line numbers, then this trick is what you are looking for. What you need to do first is install Pygments , a python syntax highlighter. sudo apt-get install python-pygments python3-pygments After installing pygments, you can now view source code with colored markups. just run the ff: pygmentize testfile.rb Now for the line numbers, you will have to pipe the `nl` command pygmentize testfile.rb | nl --body-numbering=a The option --body-numbering means it will accept a style for line numbering and it is any of the ff: a - number all lines t - number only nonempty lines n - number no lines I used  a so that everything will be numbered including empty lines. We can actually add nl options in bash alias so that we do not...